Tuesday, December 20, 2016

Getting ready for Christmas

Not long ago I came across my brother's teddy bear that my mother had carefully tucked away in a box many years ago.   Pal has been well-loved -- most early pictures of my brother show the bear tagging along whatever the activity.  I believe Pal was once golden and fluffy (there are traces of curly mohair in some of his seams).  But now he is worn smooth and his brown skin shows many broken areas where excelsior stuffing peeks through.

Poor Pal --  he was definitely in need of some loving attention!  My friend Ellen took him home and brought him back with a fresh new outfit -- overalls and jaunty cap!

Bear is pleased to be out of storage and taking his part in the family again.

As the weather grew colder, though, Pal didn't really seem to be dressed for season.  I made him a sweater.


And last time I looked I noticed that Pal was getting into the spirit of Christmas.  

Pal has decided he likes the little zigzag quilt and he is busy
sorting through the Christmas decorations.


Monday, December 12, 2016

Making some progress

Perhaps another one of this year's started projects will make it to the finish line by the end of the year!  (Is is sensible to take this on when Christmas is right around the corner and there are still holiday preparations to be done, you ask? Hey --  I'm sure I read somewhere that the only place housework comes before quilting is in the dictionary!)

Some time ago I began making blocks with plaid strips.  I blogged about it here.  I am happy to report that those blocks have been completed and assembled into a quilt top.
Seven blocks by nine did not lend itself to a traditional symmetrical layout.
 Instead the diagonals zigzag across the quilt.
 

It is time for borders.  Auditions are taking place.
Slab pieces of various medium plaids would do the trick. 
I like this idea, especially because it uses up a few more odd pieces.  That medium green seems to help the transition between the centre and the border.  (And if that particular piece isn't large enough for the job my "mature stash" probably has something else similar to augment it.  Sigh.)


Monday, November 14, 2016

In the Pink

Some of the scraps in my sewing room are sorted by colour.  This is what the Pink and Purple drawer looks like:
Drawer of odd pieces of pink and purple that don't have homes anywhere else.
This is a collection of odd bits.  Anything larger than a FQ, or anything that has been cut into one of my favourite useful sizes is not in this drawer.  And this is how full the drawer is now, AFTER a couple of projects that were done specifically to use some of this!

I spent a happy afternoon picking out squares (and cutting out more squares from some of the bigger pieces) to make this pink and green quilt.
Lap-sized quilt will be used as a Prayer Quilt by my church group.
And I've just finished a quilt  top that will be a gift for a new baby girl. (Since the picture was taken quilting has been done.  Pink binding has been added and is being stitched down as we speak!)
Baby quilt from 2" squares and triangles.

I can't imagine how many more quilt tops could be lurking in just this one drawer of scraps.  Isn't it a wonderful thing that we have such riches of fabric resources that we never need to worry about running out!


Sunday, November 13, 2016

Quiltmaker's 100 Blocks #14

A new edition of Quiltmaker's 100 Blocks comes out this week! It looks like this:

Volume 14 -- on newsstands about November 15

So, why am I so excited about this, you ask?  Because I have a block in this issue, that's why!  And not only that, my block is on the cover!  Right there, first block at the very top!  

Let me know when you see this magazine out there!  (And if you buy the magazine, you get directions for not only my block (see page 38), but 99 other blocks that are nearly as wonderful as this one.)

Monday, October 31, 2016

Pondering the scraps

Lots of things I SHOULD be doing in the sewing room, but this week the overflowing box of plaids caught my eye again.  I decided to work on "just the small bits" and try to get rid of the messy part of the collection.

I cut strips 6 1/2" long and assembled strips of "piano keys".
I made a pile of strips like this -- and most of the plaid pieces were cut a little straighter than this lot!
.
Then I cut triangles from the strips until I had a good pile. 
I added light coloured triangles to pieced triangles to make blocks.  

There are lots of possibilities for these blocks, and I'm still playing with them to see what they might become.  But I know I don't have quite enough of that gold fabric for all my blocks.  What to do? -- make a smaller quilt?  choose another background and make some blocks with each?  or pull out all the possibilities and go scrappy?  The last choice is what I'm inclined to do, but I need fairly large pieces.  Around here, 8" strips count as yardage, not scrap!


Here are a few of the fabrics that came to light on the first look through the stash.  (These are all a bit darker than the photo would suggest -- the fabric I've used in the blocks already is third from the right.)

One great thing about quilting is that there are really no "wrong answers" -- at the end of the process I'll have a quilt and it will be fine.  I just don't know yet what it might look like!

Meanwhile, here is a project that actually did get finished!
Tiny zigzags.  Blocks are 2" finished.  It didn't use up much fabric, but it is done!!


Monday, October 17, 2016

Worth making again

Quilters know that there are so many wonderful quilts out there that we will not be able in one lifetime to make them all.  But even so, some quilts really are worth making a second time.

Bonnie Hunter's Star Struck (find it among the free patterns at Quiltville.com) is one pattern I keep returning to.  This summer I realized it was time to bring out the plaids once again and cut the pieces for more of those stars.

This uses assorted plaids for the stars, assorted lights for the background stars, a constant red for the little hourglass units.

I love the gentle look of the plaids, many of them from recycled shirts.  I enjoy letting my eyes wander around the quilt to see how the various fabrics interact in the different combinations.  A motley variety of background fabrics was used here, but even the busy ones seem to settle down and blend in with the others once it is all put together.

This quilt will be donated to one of my favourite Good Causes.

Monday, September 19, 2016

A Quilter's Dozen

Every summer a group of quilting friends meets for a day of show-and-tell, visiting, and lunching out. We have an annual challenge and enjoy seeing how each person has dealt with the theme.

This year's theme was A Quilter's Dozen.  My interpretation of the challenge used a dozen Wildflower blocks (my block that is included in the current issue of Quiltmaker's 100 Blocks magazine.)  I made my blocks (twelve inch blocks, of course!) with a dozen fabrics which I carefully rotated through the various fabric placement positions in the block.  This resulted in some block colorations that I would NEVER have selected by any other method.

I was really pleased with the red and the orange in this block.

My original idea had been to make a quilt that was predominantly blue and gray, but along the way it seems that a lot of orange and red had slipped in. So when the twelve blocks were finished I chose elements from the block for the borders and the centre motif, and I used more of the cooler hues there to push the quilt back into the blue range.

Then I put the quilt on my longarm and quilted feathers and pebbles and spirals until I had filled the surface.
The most difficult part of the project was getting a decent picture!  Finally a day arrived when the sun shone and the wind did not blow too wildly.


Tuesday, August 23, 2016

Mail call

Many things in life are going digital now and it seems like we find fewer items in the snail mail all the time.  But today it was worth the walk down to the mailbox -- I found treasure there!

Advance copy of the September issue of Quilts from Quiltmaker's 100 Blocks

Of course, I turned to my own quilt first!

My quilt looks pretty good in its "glamour shot", don't you think!

I've had time now to look at the rest of this issue, and I can see some lovely designs, everything from a table topper to a baby quilt, to lap quilts and larger bed quilts.   There is plenty of inspiration here to keep a quilter happily quilting for a long time.

You'll be able to pick up your very own copy of this magazine in a week or two -- so watch for it on your newsstand.

Sunday, August 14, 2016

Another try at Celtic Solstice

I pulled out THAT project again -- the one from December of 2013 when Bonnie Hunter began the Celtic Solstice mystery quilt.  This time I made some good progress.
Both sets of blocks are completed at last.  (I've made a few changes in the star block to make the green chains run across the quilt in both directions.) 

Here are a few of the blocks laid out as they will be sewn. I find myself second guessing my colour choices, but all in all, I think I like the way it works!

For now all the blocks are back in their bag, and I was able to return the extra fabric to the stash bins. One of these days I'll take this to a group Sew Day.  Sewing all the blocks together to make the top will be the perfect project to work on while sewing with friends.


Monday, August 8, 2016

Quilter Power

A few weeks ago we received a request for a quilt for a local fundraiser event.  The timeline was tight -- only a week until the event was to occur.  We put out a request to local quilters for a quilt or a top.  Almost immediately a top was offered -- and of course, the colours were perfect.

Within 48 hours we had it backed, batted, quilted, bound.  It was completed in time for the fund-raiser where it helped raise  money for Honour House in New Westminster.  And the event organizer has signed up for our next beginning quilter's class!  (But she may find that not every quilt comes together quite as quickly as this one did!)

Disappearing 9-Patch quilt donated to Honour House fundraiser.


Monday, July 18, 2016

Chinese Coins Strip Quilt

My friend Kim does wonderful things with colour.  When she brought this little top to show-and-tell I fell in love with it.  I just might have put it into my bag at the end of the session and brought it home with me because Kim has a reputation as a serial "topper" and I couldn't bear the thought of this piece languishing in a trunk.   And it just might have been languishing in my sewing room for quite a while (I looked it up -- we were working on strippy quilts four years ago.)


I rediscovered it the other day and put it on the quilting machine. I have been quilting edge-to-edge designs on "quick quilts" recently so I changed the pace a bit and indulged in some more complex designs on this one.  I love the way the feather quilting curls through the pieced strips.


This quilt needs to find its way home to Kim soon, but I'm going to leave it on the living room floor where it catches the light just right for just a few more days.


Monday, July 11, 2016

Back to the never-ending scraps

This is what is on my wall today:
Auditioning units to make Woodland Clover blocks.
The pattern is based on the cover quilt from Pat Speth's More Nickel Quilts book.

I say "based on" because would I follow the author's instructions and start with a nice pile of neat 5" squares?  Of course not! Instead I dived into scrap bins and pulled out strips and odd bits of various sizes.  Surely this will be the quilt that finally uses up all those pieces!

When all the cutting was done I had enough pieces to make 20 blocks -- enough for a small quilt that will be donated to a Good Cause.  (The cutting took a long time because there was all that finding and measuring and trimming that wouldn't have been necessary if I'd started with squares.)

This is what a stack of pieces for 20 blocks looks like.
 This may not make a discernible impact on the scrap pile!

As I was pressing my units I noticed this:
Some of these patches have been around the block a few times already -- can you see the tell-tale creases that show seams have been unpicked?
Makes me wonder how many times I will re-use a piece before it is finally gone!

One of these days I might actually go the Main Stash and start with larger pieces of fabric, but at the moment I'm having too much fun in the scrap heap.


Monday, June 20, 2016

Butterflies

I've had in my stash for many years a length of fabric with big bright butterflies all over it.  Pretty and bright, but hard to use -- I like piecing, and this isn't the kind of fabric that cuts up very well.  I cut out and appliqued a butterfly onto a bag once, and I did manage to use a good chunk of it to back a baby blanket recently, but another piece was left.  It had been put into the give away pile a few times but always got pulled back -- it was just too pretty!

The other day I came across it again and decided that NOW was the time to get this used up!  I cut out as many 6 1/2" squares as I could -- there were 20 -- perfect!  I found a striped fabric that used the same colours for the sashing and some scrappy yellow squares for cornerstones.  Great!  This is the beginning of a child-sized quilt.
Butterfly blocks on my design wall ready to become a quilt top.

And I picked up the rest of the fabric and dropped it into the trash!  

Gone!  That's the end of that fabric!

However, if you went into the sewing room later you might have seen this:
Maybe someone needed to "rescue" a couple of butterflies and a few two-inch squares
and some 2 1/2" triangles
...


Monday, May 30, 2016

Another one finished

Decided it was time to finish this one up.  It had been in the stack of class samples for many years.  If I decide to teach that particular class again I will enjoy having reason to make a fresh sample.

 I can identify two Y2K fabrics in there, so it was made after 2000, but the top has probably been around for at least a dozen years.  It was fun to notice the different fabrics as I handled the quilt -- bits and pieces from past projects, discoveries from long ago shopping expeditions, treasured gifts from friends.

The top was probably made in two sessions.  The 25-patch blocks reveal a "use anything and everything" approach.  By the time I did the borders I was trying to coordinate colours a little more.  I seem to remember the border was going to "use up all the blues and greens" -- hah!  you can imagine how successful that was!

I quilted this with a fluffy poly batt of a kind that I don't use much any more having moved to the flatter cottons that are easier to handle and that I can purchase by the roll.  But this was a good quality batt and worked up to make a nice fluffy quilt that I'm sure someone will use and enjoy.

25-patch blocks with red corners make a secondary design of 9-patches where they meet the squares in the sashing.  

Having a tall son home for a visit gave me the opportunity to get a photograph.  (Those boys are good for something!)   This quilt will be donated to a Good Cause and will be on its way to a new home sometime this week.   Meantime, that's one UFO off the list and a bit more space on the batting shelf!


Monday, May 23, 2016

Playing with value

I've been having fun experimenting with value placement.  The block I've been playing with here is my Wildflower block.  It appears in the current Quiltmaker's 100 Blocks (Volume 13).

I began by dividing  the block into five areas.  There are several ways of doing this but I chose the block corners as area 1, the background (area inside the corners and outside the petals) as area 2, the petals as area 3, the "lines" as area 4, the 4 small squares around the centre as area 5.  The small centre square usually ended up matching the petals.

Here we have a light background around strong petals and centre squares.  The light lines really stand out on this one (I decided to emphasize the lines by paying attention to the direction of the print on the fabric.)

The stronger background area encloses the bright petals.

Here the petals and lines seem to float above the lighter fabrics.

Light petals anchored by  the surrounding fabrics.  The small squares around the centre are just a bit darker than the petals and seem to add dimension.  
I realize it might be a bit of a challenge combining all these blocks into one project, but I have a plan.  I'll let you know how it works out!

Here are some more Wildflower blocks made by my friends.
My friend Louise framed the red petals with the strong print -- this reminds me of a flower against the leaves.

Marie made three blocks in bright spring greens for a table runner.

Carol used a large scale print for the petals, and the centre square provides a bright focus point.

Kim made cherry blossoms by constructing blocks in two sizes and placing them on an angle.


Wednesday, April 20, 2016

Package at my door!

Look what has arrived on my doorstep!


This magazine will be on news stands first week of May, but I have an advanced copy!  And how did I get an advanced copy, you ask?  (Thought you'd never ask!!)  That's because one of my blocks is in there!

I've been drooling over the lovely designs -- and taking frequent peeks at my own, as well!  There are several blocks I'd love to make, but I must get another project (top secret for the moment) completed first.

Monday, April 18, 2016

Happy Hearts

A pile of bright fabrics came together to make a baby quilt. Hearts, bright fabrics, soft edges -- it all added up to some cuddly love for a tiny baby.


When the members of my sewing group learned that one of our friends had suddenly found herself fighting breast cancer we decided to use this same simple block to make another quilt.

Quilters donated hearts in bright colours stitched onto black and white backgrounds.  We cut each heart in half, combined halves to make blocks, and added bright borders.
We paired up the heart halves and carefully chose
bright fabric strips to go around each block.

Each block was trimmed to produce a twisted frame.  Then we sewed blocks into rows and enjoyed the way the hearts and colours dance across the surface.


The back of the quilt incorporates leftover fabrics from the front
 along with muslin squares on which the recipient's friends
 have written notes of encouragement .
When the quilt is washed the edges of the hearts will roll and fray a bit to add a softer look to the design.

Monday, March 14, 2016

Smoothing Iron -- borders at last

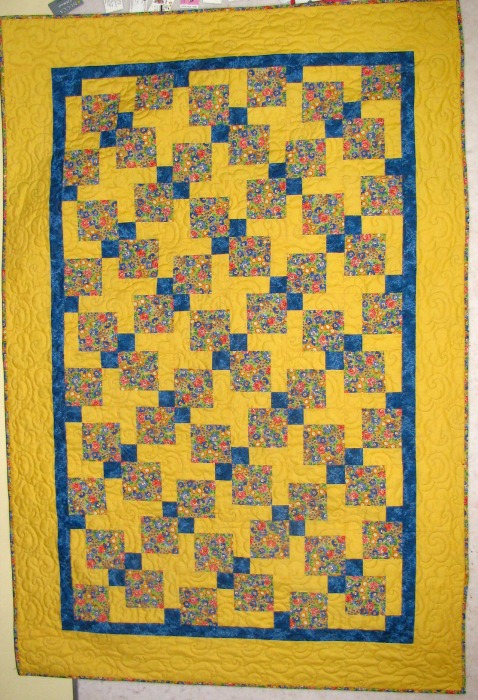
Has this top really been sitting for more than two years?  When I last wrote about it it was still in the construction phase.  That blog post is here.  Since then I have completed the piecing and added a first border, yellow.

But the time has come for this project to be done.

I found a large piece (over 2 metres) of an intricate indigo print.  Clues on the selvage led me to a website that indicated this was a type of batik from Indonesia.  The design is very precise and the repeats are exact, so this is a different type of batik than what we usually buy in quilt shops today.

Since there are four complete repeats of the design running the length of the fabric my first thought was to cut the borders lengthwise.  But I couldn't find a five inch section I liked and making the pattern match at the corners seemed like a complicated task..


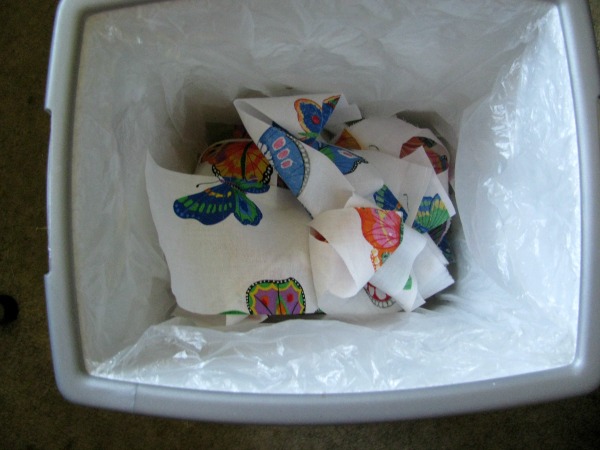
 I  decided to cut the strips across the fabric instead of along the length.  I was able to cut plenty of 5 inch strips with the designs centred -- as long a I cut the strips with a slight curve!
A bit of steam from the iron was enough to straighten each curved strip when I laid it between straight lines marked on the ironing board cover.  

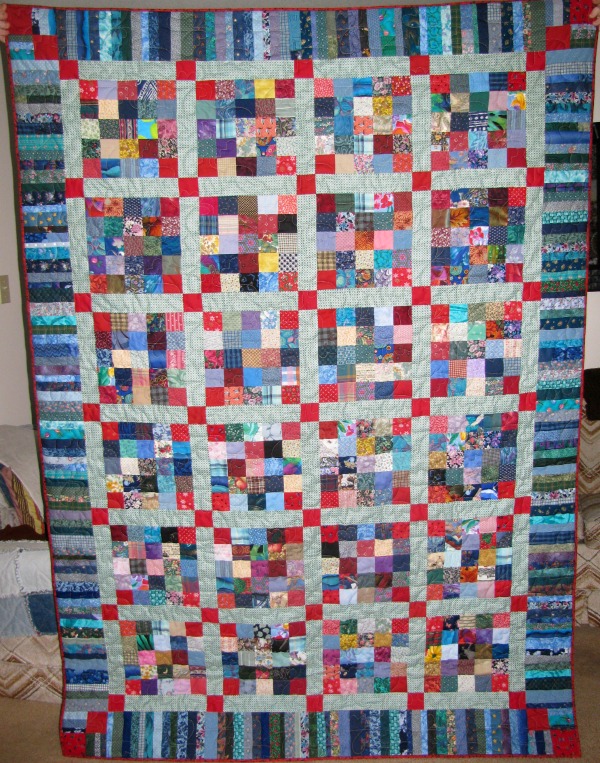
Two strips together were long enough to make a border for the short side (width of quilt plus allowance for mitering.  I pieced them together, carefully reversing and matching the design at the centre.  Then I determined where the corners of the quilt were going to fall and made borders for the long sides, making sure that the same point would fall at the corners.  This meant I needed to splice extra length into the strips -- more careful matching.

With all that matching and pinning and stitching (and re-stitching), the designs worked out and I was able to complete four corners, all the same.


Yes, I do know that one should not combine butted borders and mitred borders in the same piece!  But there are a couple of reasons to do that here.  First, the yellow border was added many months ago, before the plans changed.  And second, I don't think a 45 degree mitre would look right meeting that 60 degree piecing line at the corner!  That's my story and I'm sticking to it!

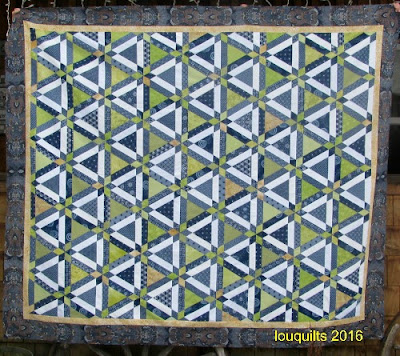
The completed top.  Next step -- quilting!


Monday, February 22, 2016

What was I thinking?

It all made perfect sense while I was doing it!

I came across some good-sized scraps of this pretty floral in a pile of donated fabrics:

There was plenty for borders of a quilt, so I proceeded to the scraps for some fabric that would go with it.  I was thinking oranges, browns, perhaps?

I came up with these:
A light print that picks up the gold, some golden yellows, a few red-violets.  Not what I expected, but I like it so far.

I made a batch of blocks.  This was the perfect chance to try out a new quilting book from the library. I had recently been asked to help select some new books for the quilting section.  I included Cut and Shuffle Quilts by Jan Ochterbeck on my list and was eager to read it as soon as it arrived.

I am always interested in techniques that involve sewing fabric together and then cutting it up again. I found the author's instructions very thorough and clearly illustrated.  She includes tips for cutting and piecing that make this a very useful book.

My dozen blocks were soon made and I started laying them out on the wall.  Dilemma -- I needed another colour in there, and nothing I tried seemed to work.  Orange was too -- orange-y.  Using the floral print for all the sashing was too much of the same thing, especially as I planned on using that for borders.  I finally consulted my colour tools and decided that a nice medium teal-y blue would fit the bill.  It would be a complement to all the red-orange that I was seeing.

But now that the quilt is all together, I don't know how successful that colour choice was!!
The blue plus signs in the sashing seem a bit surprised to find themselves there!

Don't get me wrong -- I'm not taking it apart!  I think a bit of blue in the border might have helped, but the quilt needed to be this size and no larger and there didn't seem to be room for blue.  I don't think a blue binding is the answer, either!

But -- as I often tell my friends -- the ONLY time anyone is going to be looking at this quilt and analyzing the colour balance is right now.  Once this quilt is finished and wrapped around someone what matters is that it is bright and colourful and warm and full of comfort.  Those rather odd bits of blue really won't matter.